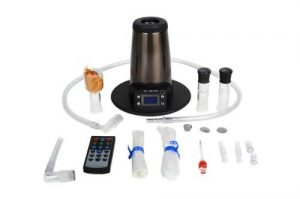
Created by a Canadian company, the Arizer Extreme Q is a great vaporizer with glass-on-glass connections and a ton of cool accessories.
-
CBD Vape, CBD Vape Kits, Innokin, Vape Kits, Vaping Products
Innokin Endura T18E 2 Kit
£19.58 (Incl. of VAT)Select optionsQuick View -
CBD Vape, Disposable Vape Pens, Disposables, Vaping Products
0mg SKE Crystal Bar 600 Disposable Vape Device 600 Puffs
£4.17 (Incl. of VAT)Select optionsQuick View -
CBD Products, CBD Vape, CBD Vape
LVWell CBD Iso-Vape 300mg 30ml E-liquid
£5.83 (Incl. of VAT)Select optionsQuick View
I’ve owned mine for two years now, and it has performed consistently well even in heavy usage settings. However, in order to ensure that your Extreme Q vaporizer is functioning at optimal levels, some maintenance must be performed from time to time. Below are some simple maintenance tips which can help keep your Extreme Q in tip-top shape!
Clean The Glass Joints
Difficulty: Easy
Frequency: 1-3 Months, depending on usage
One of the benefits of the Extreme Q is that it uses glass-on-glass (GoG) connections, creating a consistent and impurity-free vapor. After a while, these joints can become quite coated with resin, making the unit smell and become sticky to the touch. Once you notice a buildup of resin that you feel is too much, simply soak all the glass joints in a solution of strong alcohol such as Bacardi 151 or 70-99% isopropyl alcohol. I like to use a tupperware container and to stir every 5 minutes or so. After about 25 minutes, I remove the glass and use pipe cleaners to remove any remaining resin. People say that the Extreme Q is a lot like the Classic Volcano so we wrote a guide to deep cleaning your volcano as well.
Keeping the Extreme Q glass joints prevents them from becoming stuck to one another due to the resin acting as a glue. If you have PVC tubing on your Extreme Q, make sure not to get any rubbing alcohol on it, as it will degrade! You can even make iso hash with the leftovers of the alcohol bath. Simply let the alcohol used to clean the glass to dry out on a large plate, making sure to leave it in a well-ventilated space. When the alcohol evaporates, scrape the leftover resin off of the plate, and you should have some iso hash. In my experience, this isohash tends to be low grade but I can get quite a few hits from it.
Use Glass Lubricant
Difficulty: Easy
Frequency: 2-3 weeks
Sometimes, the glass-on-glass connections on the Extreme Q can become stuck. In order to minimize this chance of this happening, apply a glass lubricant to reduce friction between the joints. Various manufacturers produce gluestick style glass lubricant, and you should be able to use one of these products (providing it is heat safe).
Switch To Silicone Tubing
Difficulty: Easy
Frequency: Once
The stock hose that ships with the Extreme Q is a PVC hose with an inner diameter of 5/16″ and an outer diameter of 7/16″. Although it is a decent starter hose, it cannot be cleaned with rubbing alcohol, and resin can build up easily. Medical grade silicone tubing, on the other hand, is much more flexible than PVC and can be cleaned in rubbing
Disassembling & Deep Cleaning your Classic Volcano Vaporizer
alcohol much in the same way that the glass parts can. If switching to silicone is not an option, then replace your PVC tubing every few months. Here is the perfect silicone whip tubing from VapeWorld designed to fit the Extreme Q. Also, if you’re someone who is worried about breaking your Cyclone Bowl, I suggest purchasing an Extreme and V-Tower compatible Tuff Bowl. The Tuff Bowl is coated with a protective teflon layer, which makes it very durable while at the same time providing a good vape experience.
Clean The Extreme Q Base
Difficulty: Medium
Frequency: 3-6 Months
Tools: Small Star Screwdriver
Every now and then, we’ve all spilled a little bit of herb inside the Extreme Q while trying to fill up the cyclone bowl. Over time, these herbs can accumulate at the bottom of your vaporizer and are best dealt with by removing the baseplate of the unit. When I removed my baseplate for the first time in two years, I was surprised to find about .5 grams of green herb trapped inside my baseplate. I imagine I could’ve found even more had I not shaken the vaporizer on occasion prior to opening it up.

To start, unplug your Extreme Q at its base, and remove the cyclone bowl. Carefully flip the unit upside down, and remove the four small rubber feet found at the bottom. In the photo below, I have 2 of the four feet removed, exposing the screws underneath. Once you’ve removed the rubber feet, use a small star screwdriver to unscrew the screws. Now, this is where you have to be careful. Gripping the Extreme Q and the baseplate with both hands, flip it over right side up and place it on a table. Now, remove the Extreme Q from the table, and let the baseplate gently come out. There will be two parts to it, a clear ring and a black bottom. The black part is where you should find your lost herb. Collect it all up, and then get ready to reattach everything! To reattach the bottom, flip your Extreme Q upside down again, and line up the two baseplates with the screw holes. Screw the screws back in, and put the feet back on the unit. The Extreme Q functions perfectly fine without the baseplate, although I only tested this with the whip and didn’t use the fan (maybe the base improves airflow?). Also, without the baseplate you can’t really see the blue LED baseplate lights since the unit sits too close to the ground. If desktop vaporizers aren’t for you then why not check out Arizer Solo 2 review or Laurence Fishburne with a Solo 2 and so if a portable vaporizer is more your style.
Conclusion
In my experience, following these simple maintenance guidelines has helped keep my Extreme Q in excellent shape. Also a side note you can increase the capacity of your bag vaporizer with oven bags. The Extreme Q is a well-made vaporizer, and I expect to get years of good use out of it!
The post Caring for your Arizer Extreme Q – A Comprehensive Guide first appeared on CBD Village UK.


