
Well, you could certainly do one thing right now, and that would be shove your face in these crockpot chalupas.
The second thing would be leave your front door open as a symbol of neighborly friendliness, watch the neighborhood car show, and find out how much you can sound like a mom when you repeatedly use words like Vroom Vrooms.
The third would be join obscure video social media networks.
Check, check, check.
Last night I made something else for dinner. It was not chalupas and that was not okay. It was veggie curry in the crockpot and itttttt… was gross. Sad story. I was even feeling especially inspired to pack some vitamins into my body. Inhaling clouds of black exhaust while sitting on a motorcycle in traffic in the Philippines will do that to a person. But apparently the forces of nature wanted me to eat another chalupa instead.
And friends, I did NOT complain.
Are crockpots the best thing ever or are they THE BEST THING EVER?
Hail you, Creator of the Crockpot.
Here are the directions for this recipe: Cover and cook for 8 hours. Done.
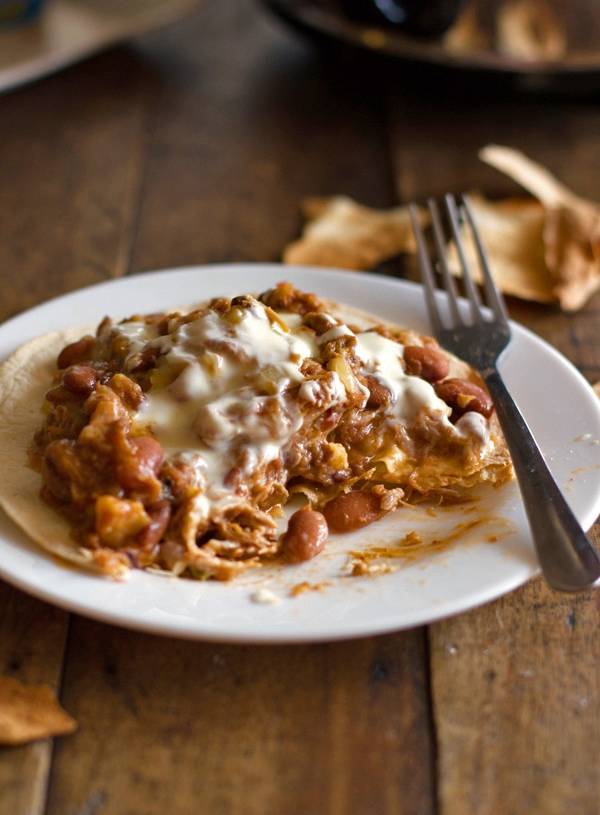
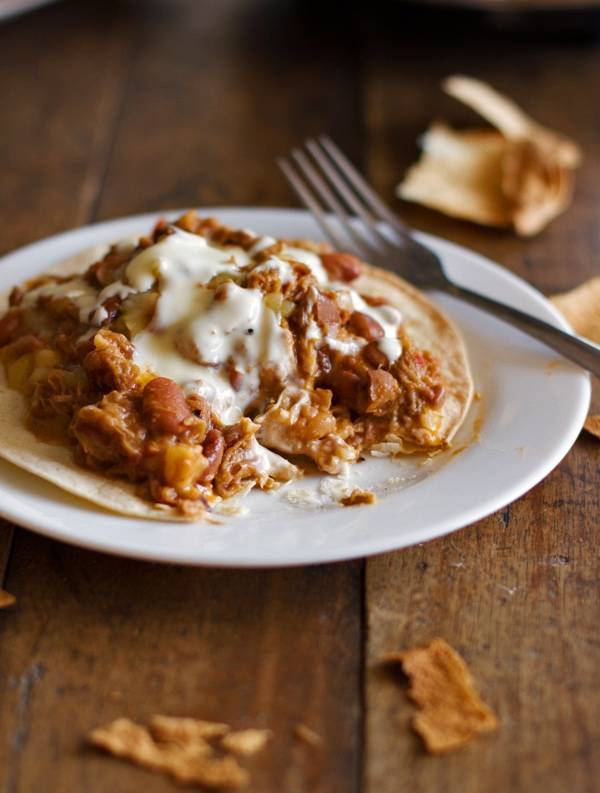
You just can’t argue with spicy, flavorful, tender shredded pork and pinto bean filling that cooks itself for you all day while you’re at work. Then you’ll get home from work a hot sweaty mess (or a sloppy snowy mess? I’m not jealous but I’m totally jealous.) and dinner will be made. Your only job is piling it high on top of a crunchy – wait for it – baked tortilla. With.sour.cream. You can do it.
In case you’re wondering if you should you try this on corn tortillas, my answer is yes.
Mexican food for the win.

Crockpot Chalupas
-
 Total Time: 8 hours 5 minutes
 -
 Yield: 12
Description
These crockpot chalupas are so easy to make and so addicting! Shredded Mexican flavored pork and pinto beans over a baked crispy tortilla. Yum!
Ingredients
- 1 lb. pork shoulder
- 1 lb. dry pinto beans (rinsed)
- 6 ounces light beer
- 1 15-ounce can fire roasted tomatoes
- 6 cloves garlic, minced
- 2 jalapeno peppers or other hot chili, minced (ribs and seeds removed to keep it mild)
- 2 teaspoons chili powder*
- 2 teaspoons cumin*
- 1/2 teaspoon cayenne pepper*
- *AND/OR a tablespoon or two of taco seasoning (I used them all)
- generous pinch or two of salt
- 1 1/2 cups water
- 3/4 cup shredded cheese (I used Mozzarella)
- 12+ flour tortillas
Instructions
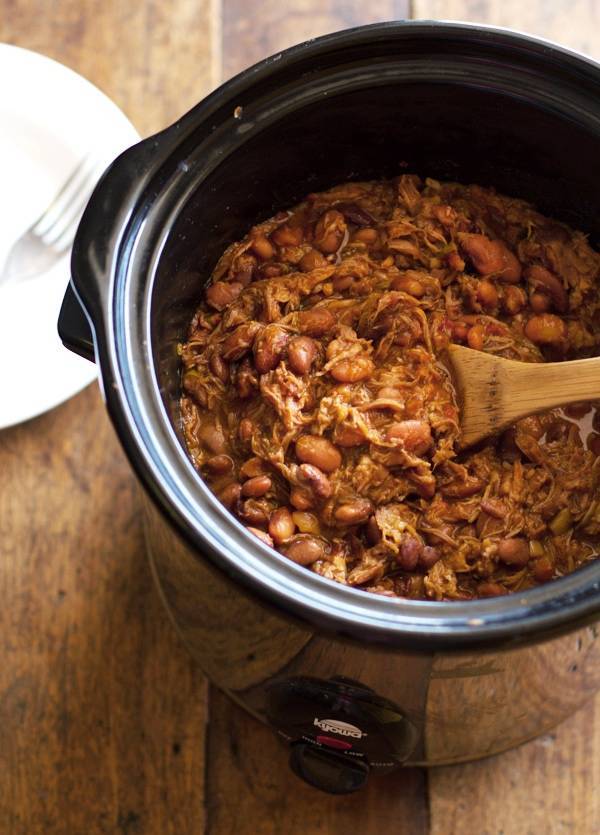
- Place the pork shoulder in the slow cooker. Cover with dry pinto beans, beer, tomatoes, garlic, jalapenos, chili powder, cumin, cayenne, taco seasoning, salt, and 1 1/2 cup water. Cook on low heat for 6-8 hours or high heat for 4-6 hours. Don’t open the lid – it adds to the cooking time.
- Remove the lid after the cooking time and shred the pork using two forks. You can do this directly in the slow cooker. If it’s too runny, continue to cook with the cover off for a little while. If it’s too dry, add more water.
- Sprinkle cheese on top, replace the lid, and cook for another 30 minutes to allow the cheese to melt.
- Meanwhile, preheat the broiler. Place tortillas directly on the oven rack and bake for 2 minutes or until golden brown. Flip the tortillas and bake for another 1-2 minutes under golden brown and crunchy. Be careful because they burn easily! Remove from oven and allow to cool.
- Top each tortilla with pork and bean mixture and sour cream.
Notes
The longer you cook this, the better it tastes! We actually cooked it the day before and then reheated it in the crockpot the next day and it was so full of flavor!
Other topping ideas include fresh tomatoes, lettuce, cilantro, crumbled Cotija cheese, jalapenos, or guacamole.
-
Prep Time: 5 mins
-
Cook Time: 8 hours
-
 Category: Dinner
-
 Cuisine: Mexican
Keywords: crockpot chalupas, chalupas, mexican pork chalupas
Take that, Monday.
The post Crockpot Chalupas appeared first on Pinch of Yum.